How To Add Google Analytics To Shopify (And Use It)
Our independent research projects and impartial reviews are funded in part by affiliate commissions, at no extra cost to our readers. Learn more
Understanding Shopify analytics is key if you want to run a thriving ecommerce store.
If you run an ecommerce store on Shopify, you’ll know one of the biggest challenges is finding out how your customers are using your store.
Brick-and-mortar store owners can ask them in person what they think of their products, layout and checkout process. But your shoppers sit behind a computer and could be miles away.
As an ecommerce store owner, that presents a bit of a problem right? Even once you’ve found the information you need, how do you use it to improve your Shopify store?
If you’re looking for an answer to these questions, you’ve come to the right place. To provide a quality shopping experience you need to know what your customers want. The way to find this out is through analytics.
In this guide we’ll show you:
- How to add Google Analytics to your Shopify store.
- How using Shopify analytics tools can improve your online store and make more sales.
- How upgrading to a premium Shopify plan gives you extra reports and stats that you can use to drive growth and increase your profits.
OVERVIEW OUTLINE
Click on the following links to read the specific sections:
What Are Analytics?
Before we show you how to add Google Analytics to your Shopify store, you might be wondering what analytics actually means.
Analytics is about finding data on how customers use your store (such as how long they browse your site for), interpreting that data and using it to improve your business’s performance. In this case, understanding your Shopify analytics, and improving your Shopify store.
It might sound super technical but don’t worry, any store owner can do it!
You might not be able to see them, but your customers tell you plenty about themselves (how they shop, what they’re interested in) every time they access your site.
Understanding what they tell you is how you know what changes to make to your store.
Numbers and spreadsheets may not sound like a whole lot of fun, but getting a hang of Shopify analytics is key to learning how to sell on Shopify successfully.
Knowing where your customers are from, how long they spend on your site and what products they like will help you improve their experience (and the better their experience, the more likely they are to buy).
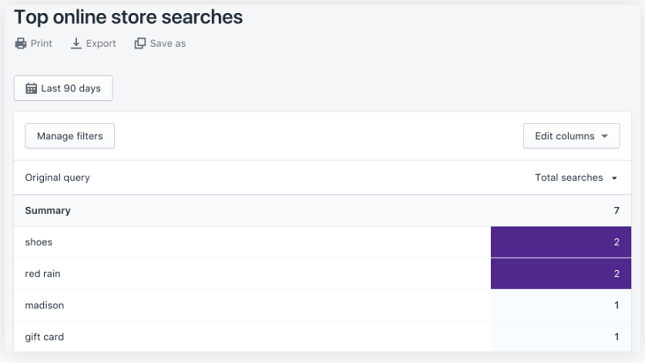
In a nutshell: the more you know, the better your store can be.
You’re probably thinking you have to be a math genius to do all this, but ecommerce platforms like Shopify give you the power to learn the ropes and find out exactly how your site works. Shopify analytics reports are really robust and accessible.
Adding Google Analytics to your Shopify store is free and is the first step to creating a data-driven strategy for your ecommerce store.
Not built your online store yet?
Try our top-rated online store builder Shopify for just $1/month for three months– this applies to the Shopify “Basic” plan. You can also sign up for a three day free trial of all plans.
Online Store Builders Comparison Chart – the 5 best ecommerce website builders. We’d recommend picking one from our list if you’re looking to build an ecommerce site.
How To Build An Online Store – has everything you need to know to create an ecommerce store.
Top Ecommerce Platforms – try our interactive guide to find the best ecommerce platform for you.
Shopify Review – why we think Shopify is the number one ecommerce website builder.
How To Add Google Analytics To Shopify
Step one is adding Google Analytics to your Shopify store. That’s what we’ll show you how to do now.
At this stage, you might be wondering, why should you use Google Analytics? What is Google Analytics for?
Well, analysis should always lead to action. Making changes to your site that aren’t backed up by insights is like sticking your finger in the air to work out which way the wind is blowing: it’s just guesswork.
On the other hand, say you’ve checked your Google Analytics and can see that 35% of all your visits are from mobile.
As an owner who’d like to see their business grow, you’ll want to make sure your site is working perfectly on mobile so those visitors turn into buyers.
Spending the time creating a great Shopify store but then sitting back and just waiting for the sales to magically appear would be like buying a ferrari but then never looking at the dashboard when you’re driving – you’re still moving, but have no idea how much fuel is left, how fast you’re going or whether your oil is running low.
A waste of your efforts, right? You want to get the most out of your store don’t you?
Look at the dashboard (or Shopify analytics) and you can improve your driving (running your store).
To grow your store (and carry on growing), you need to get to know your customers. That’s why integrating Google Analytics with your Shopify store is so important.
The good news is it’s not just important, it’s also easy.
Watch us add Google Analytics to Shopify
In the video below we show you how to add Google Analytics to Shopify:
The first thing to do if you want to learn how to integrate Google Analytics in your website is to create a Google account (if you haven’t got one already).
You need to make a Gmail account, but if you want all you need to use this for is running Google Analytics on Shopify.
Once you have your Google account, follow these steps (follow our mouse in the video above if you’re not sure how to do it):
- Create an account for your Shopify website
- Enter your store’s name
- Copy and paste your Shopify store’s URL
- Select the industry you work in
- Hit ‘Get Tracking ID’
- Accept Google’s Terms & Conditions
- Copy the code
- Open up Shopify and select Online Store
- Go into Preferences
- Paste the code into the Google Analytics box
- Save
If you’ve setup Google Analytics on your Shopify store but nothing has happened, don’t worry. It can take up to 24 hours for Google Analytics to start collating data.
Setting up Google Analytics on Shopify is just the first step. To run a big, successful ecommerce store on Shopify you might want to consider upgrading your Shopify plan. You can try ‘Shopify Advanced’ for free by starting a store as you normally would and choosing the ‘Advanced’ plan in the settings (just remember to cancel or change plans before the end of the trial to avoid getting charged).
See Shopify’s Pricing Plans Now
Upgrading to Universal Analytics In Shopify
Now you’ve installed Google Analytics on your Shopify store, we recommend upgrading to Universal Analytics.
Don’t worry, this isn’t a completely different tool that requires tons of legwork to set up and learn.
It’s just the latest version of Google Analytics and offers a load more features, such as cross-device reporting (basically, how your customers are using your site on mobile compared to desktop).
When we recently added Google Analytics to our Shopify store, it automatically used Universal Analytics, so you may not have to actively upgrade at all.
If you need to upgrade, you’ll see this message in your Shopify store’s admin page:

Universal Analytics will give you greater insights to help you improve your store because it provides really ecommerce-focussed analytics, such as:
- How many views your products have had.
- How many times shoppers have clicked on each product.
It’s like you’re using a magnifying glass as well as your normal reading glasses: you’ll be able to see much more detail than before.
Google Analytics: Understanding The Basics
OK, so you’ve added Google Analytics to Shopify and are ready to learn about your store.
Does all the jargon look like a foreign language?
Don’t worry, understanding Google Analytics just takes a little bit of homework on your part.
Once you’ve added Google Analytics to Shopify, browse some of the really handy guides available online. Google has a helpful introduction on getting started with analytics, and Shopify has a dedicated Google Analytics support page.
Going through all the different parts of Google Analytics would take A LOT more than just one guide (and that’s not what this guide is about). But we’ll give you a quick definition of each of the key metrics you can see on your dashboard.
- Sessions – the number of interactions one visitor makes in 30 minutes when they visit your store (Google’s default timeframe). So if a shopper arrives on your site, visits two pages, buys a product and exits in under half an hour, this counts as one session.
- Users – visitors who have initiated at least one session, so this doesn’t include users who have had multiple sessions. For example, a user who visits your site and returns an hour later would count as two sessions, but one user.
- Average Session Duration – how long, in hours, minutes and seconds the average session lasts.
- Bounce Rate – we’ve all done it: clicked onto a page but hit the back button immediately because we haven’t found what we’re looking for. We haven’t interacted with that page and Google calls that a bounce. Bounce Rate is just a way of measuring how many people are doing this on your site.
- Percentage New Sessions – what percentage of your sessions are first-time visits.
In the next section, we’ll show you how you can use Shopify analytics and Google Analytics to improve your Shopify store.
Using Google Analytics With Shopify
Once you’ve got Google Analytics up and running, what next?
Now we’ll show you how even a basic knowledge of Google Analytics can help you improve your store. You can see:
- How many visitors your store gets
- How long those visitors hang around
- What state (or country) they’re from
The amount of information can feel overwhelming and we recommend not diving in too deep to start with. Focus on some key metrics that really matter to your store.
There’s an incredible amount of data at your fingertips and real insights can get drowned out in all the noise. Sometimes less is more when it comes to Shopify analytics reporting, so give yourself time to learn the ropes and, at first at least, start with the basics.
Even simple bits of analysis can throw up changes that may have a huge impact on your store.
The point of adding Google Analytics to your Shopify store is to track as much of your users’ interaction with your site as possible. The more you track, the better you can understand your own site.
In the rest of this guide we’ll explain how using Google Analytics with Shopify analytics is the best way to run your store.
A big benefit of Shopify premium (more on this later) is that by providing you with easily-digestible Shopify analytics reports it helps owners like you break down your store’s analytics and get to the really important stuff.
See Shopify’s Premium Plans Now
Get the most out of Google Analytics
Google Analytics is a data-rich gold mine, but how do you dig into the stats to improve your Shopify store? That’s what you want as an ecommerce store owner isn’t it?
Below we’ll show you some simple ways you can start using your data to improve your store.
To get the most out of your Shopify analytics, get a piece of paper and write down two or three key business goals (you’ve probably thought of these already, but it’s useful to refresh your memory).
For example, one business goal could be to reduce bounce rate on a key product page. If you can tell customers aren’t engaging with your product, ask yourself:
- Is the product’s image appealing?
- Does the page inspire an action from the visitor?
- Is the product’s positioning on the page awkward for the customer? Do they have to scroll down too far to get to the product?
- Is it clear what the page offers the visitor?
Then try to fix the problem by taking action. You could:
- Rewrite the product description
- Find a more professional image for your website
- Change the page’s color scheme
- Redesign the product page to make life easier for shoppers
You could replicate the above process at each stage of a sales funnel to refine and improve it.
Running an ecommerce store without data is like playing pin the tail on the donkey blindfolded.
Analytics help you get close to your customers so you can understand their needs. That’s what this is all about: improving your store based on what your customers want, rather than what you think they want.
Google Analytics lets you see in real time how many people are on your store – as do Shopify’s analytics reports – and where they’ve come from. This is perfect if you’ve just launched a social media or email campaign and are keeping an eye on expected spikes in traffic.
Your store data will be unique to you, but here are three examples of the kind of changes you could make after digging into the data:
- If you can see a majority of your customers are in a particular area (San Francisco, for example), find a new distributor of your products with warehouses closer to the location. This could mean lower delivery times for customers (and lower costs for you). Lower costs + happier customers = bigger profits!
- If you can see that most of your customers are accessing your site on a mobile, then you can dedicate more of your time to optimizing your site for mobile sales.
- If the bounce rate of a particular product page is unusually high, it probably means the page isn’t what your customer expected. Make sure any marketing material driving traffic to your page is accurate and consider changing the page’s title.
To get access to the best reports in Shopify analytics, you need to upgrade your store to ‘Shopify Advanced’. To see what you get on Shopify’s more advanced plans, hit the button below.
Compare Shopify Pricing Plans Now
How to enable Enhanced Ecommerce Analytics In Shopify
If you want to really take advantage of Google Analytics on your Shopify store, now’s the time to enable Enhanced Ecommerce.
Enhanced Ecommerce was rolled out by Google a couple of years ago to give store owners like you even more insights into every stage of your customer’s journey.
Rather than the mass appeal of Google Analytics, Enhanced Ecommerce has been designed directly for online store owners.
One potential problem of relying on normal Shopify analytics is losing sight of your customer after they have clicked on your product and gone through to a Shopify checkout page. They enter a kind of blindspot.
Choosing to add Enhanced Ecommerce is like turning a bright light when looking at your analytics because it adds Google Analytics onto your Shopify checkout page, as well as your shop pages. Remember, your Shopify analytics are your best indicator of how your store is being used.
This means you can track exactly what your customers are doing, from clicking, to reading, through to purchasing a product.
We won’t go into all the features of Enhanced Ecommerce here because we’re guessing you just want to know how to add it onto your Shopify store? (If you do want to find out more about Enhanced Ecommerce, Google has a useful guide).
Adding Enhanced Ecommerce is free and easy. All you have to do is tick the box in the Preferences section of your Shopify admin tool.
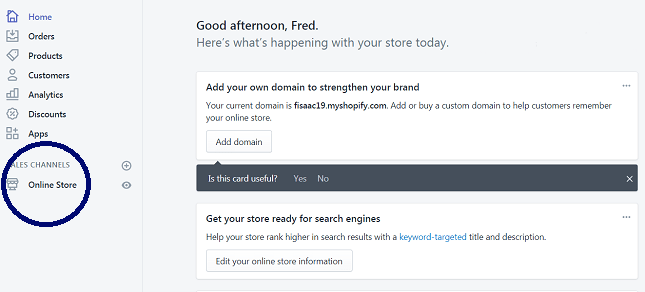
First, head to Online Store in the left navigation:
Then select Preferences:
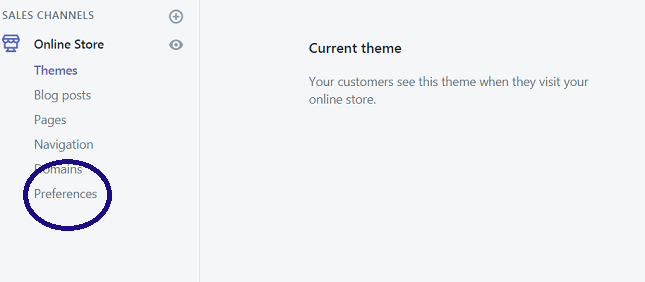
And check the box labelled ‘Enhanced Ecommerce’

You also need to enable Enhanced Ecommerce tracking in your Google Analytics account.
To do this, head over to Google > go to ‘Ecommerce Settings’ in your store’s account > Select the Enable Ecommerce Status > and toggle it ON.
Turning on ecommerce tracking in Google Analytics means you will be able to see invaluable data that Shopify has passed on to Google which reveals what your customers are actually buying.
Transaction tracking is all about understanding your customer’s ecommerce journey.
One common concern we hear from Shopify owners is that if a customer pays through PayPal rather than Shopify’s own checkout system, you’ll lose sight of that sale.
We put this problem to Shopify.
PayPal sales go through the Shopify Checkout and are redirected to PayPal. Those sales are still tracked in Shopify, same as if your customer placed a credit card order on the Checkout too and you can see a clear breakdown in your Shopify reports.
Upgrading To Get Shopify Premium Reports
Did you know a staggering 80% of large retailers use Google Analytics?
Using Google Analytics is clearly absolutely necessary, but it’s using Shopify analytics available on a Shopify premium plan with Google Analytics that can give your store the edge.
That’s what we’ll cover in this section.
So much data can feel overwhelming. It’s easy to get lost in the different reports and end up paralysed for choice (we know from experience running an online business).
That’s where Shopify premium reports can help.
Every Shopify plan gives you access to basic levels of reporting:
- Live View
- Finance Reports (your taxes and payments)
- Overview Dashboard.
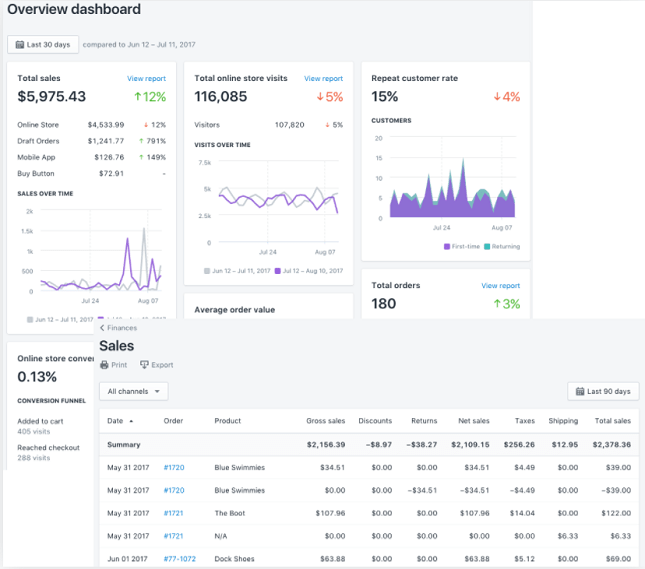
But there are BIG advantages upgrading to an advanced Shopify plan. That’s what we’ll focus on here.
Shopify’s premium reports will give you a very clear breakdown of your store’s key data.
As you’d expect, the better your Shopify plan, the better Shopify analytics you will get access to. Upgrading to Shopify’s advanced plans is like shifting your car up a gear: you can make your site run smoother and more efficiently.
Here are the different levels of Shopify reports available on each plan:
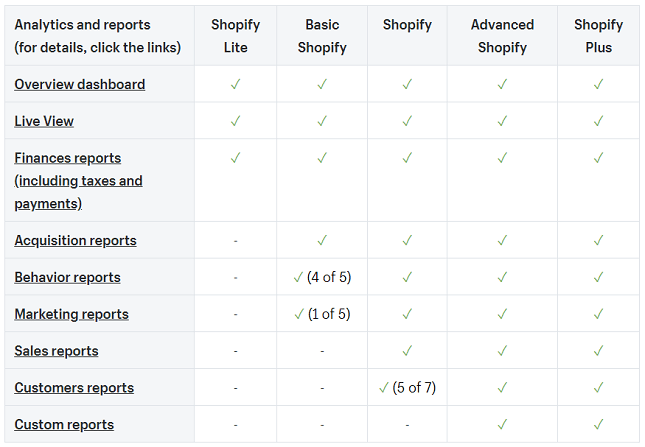
If you’re intent on growing your ecommerce store and making some decent cash in sales each month (either to top up your income or as your primary business), you’ll want to think about upgrading to at least the ‘Shopify’ plan.
If you’re already a medium-to-large ecommerce store with large revenues, an ‘Advanced Shopify’ plan is definitely right for you.
The more traffic and sales your site gets, the more information your site produces. The better you can digest this information, the more chance your site carries on growing.
And that’s what we all want right? As every business owner knows, the more you understand your customers the better you can make your service for them.
Shopify’s more advanced plans allow you to really dig down into the detail. For example, with a ‘Shopify’ plan you could build a custom report that tracks the changes in orders from month to month.
As we’ve mentioned before, Shopify’s reports shouldn’t be used instead of Google Analytics, but should be used hand-in-hand with Google. They can be incorporated directly into your Shopify store.
Together, Shopify analytics and Google give you a full and detailed picture of how your store is working to meet your customers’ needs. You’re then better equipped to fine tune your site to keep your customers happy.
With the information available on Shopify’s professional reports, you’ll be able to provide a far more personalised service. It’s like cooking dinner for a friend where you’ve found out exactly how they like their favourite meal prepared and what ingredients they prefer.
Shopify’s custom reports let you filter and edit the default reports so you can drill down into the area of your that site you want to improve. If you’re on the ‘Advanced Shopify’ plan or higher, you can save your filtered and edited reports or create custom reports from scratch.
We found Shopify’s premium reports are very clearly displayed and easy to understand – and like you we don’t exactly come from a background in data analysis.
We’re going to run through three reports that you can’t access on ‘Shopify’s Basic Plan’, but that can add huge value to your business if you upgrade to ‘Shopify’ or ‘Advanced Shopify’. They are:
1.Shopify Sales Reports
As a business owner, your sales are ultimately what matters most to you.
You created your shopify store to make a bit of extra money, right? which makes it doubly important to know as much as you can about each and every sale you make!
If this is the case, you’ll want access to Shopify’s sales reports.
We find the way Shopify analytics breaks down your sales really clear. You can see:
- Where your sales have come from
- How your sales are changing (hopefully up) month-to-month and day-to-day
- Which products are selling best
- How effective any discounts you’re running are
- What marketing channel your sale came from (Facebook advertising, for example)
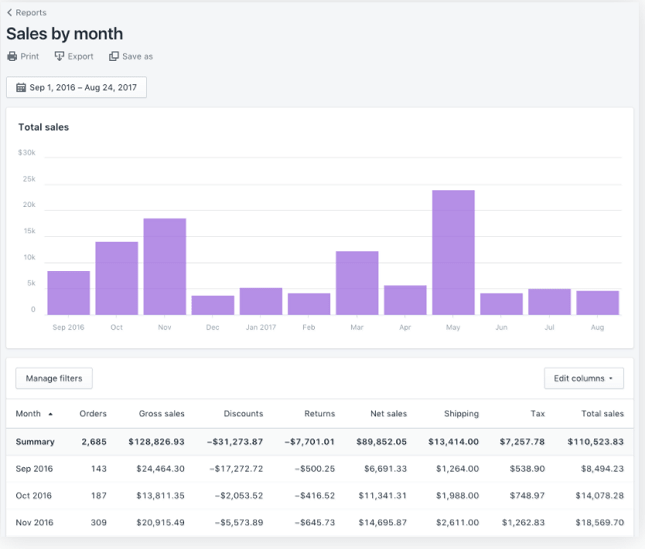
Shopify sales reports help you stay on top of any sales you made, but also the sales you didn’t make. You can see returns and any orders that have been canceled – these appear as a sale the day the order was placed but then change to a return the day of cancellation.
The key thing is that Shopify’s sales reports help you improve your ecommerce site. Otherwise what’s the point right?
If, for example, you see that a particular product has got an unusually high return rate, you might want to check the product description.
Does it accurately describe what the customer is going to get?
Or ask yourself if the shipping options are attractive enough.
Is it too expensive to deliver the item? Does it take too long?
Also look at the product image, does it sell the product or is it a bit underwhelming?
From gross sales to total sales, there’s a lot of jargon when it comes to running your Shopify store. Shopify have explained some of the common sales report terms on their site.
Sales Reports are available on Shopify’s standard ‘Shopify’ plan. If you’re on Shopify’s ‘Advanced’ or ‘Plus’ plans, you can also filter and customize your sales reports to only show the information you’re after (more on custom reports later).
2.Shopify Customers Reports
You can see Shopify Customers reports if your store is on the ‘Shopify’, ‘Advanced Shopify’ or ‘Shopify Plus’ plans.
While you can learn a lot from Google Analytics directly, Shopify’s Customer Reports gives you access to more detail and breaks that detail down into more manageable chunks.
The Customers reports mean you can really dig into the finer points and paint a full picture of who your customers are. This is so useful because it allows you to adapt your store to suit your customers’ needs.
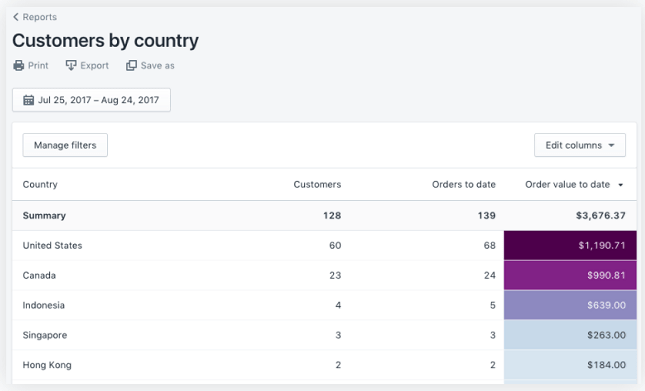
The core insights are similar to the information provided by Google Analytics:
- Customers by country
- Returning customers
- First-time v returning customer sales
- Customers that only use your store once
If you’re on ‘Shopify Advanced’ or ‘Shopify Plus’, though, you get access to two bits of information we think are really powerful:
- At-risk customers – customers who haven’t bought from you for a while, and who Shopify think there’s a chance won’t return.
- Loyal customers – customers who have bought from you before and who Shopify reckons will buy from you again.
You may now be thinking, ‘so what I only care about selling, why would I need to know this?’
Imagine your ecommerce store is like a ship. Losing customers is like leaking water. Knowing who your at-risk customers are, and being able to convince them to shop with you again, is like being able to seal the leaks and cracks in your hull.
Once you know which of your customers are loyal and which might be unlikely to visit your Shopify store again, you can take action.
This could include sending an email rewarding your loyal customers with an exclusive event invite, or offering at-risk customers a one-off discount to encourage them to shop with you again.
You can set these emails to be sent “3 hours after your customer leaves”, or “24 hours” etc.
3.Shopify Custom Reports
Building custom reports lets you focus on exactly what you want.
You need to be on Shopify’s Advanced Plan or Shopify Plus to customize your reports.
You can base your custom reports on 5 factors:
- Sales
- Payments
- Taxes
- Vistors
- Customers
These are like jumping-off points: you start with one base, e.g. sales, and then filter and edit to find the information you want. For example, first time buyers outside the US.
Customized reports work like a sieve when you’re cooking. You can use them to sift out the unwanted stuff to leave the bits you’re really interested in.
Here’s an example of how customizing a default sales report would help you improve your store.
Let’s say you wanted to see how your products were selling in New York. You could build a filter that showed you how many sales you had made in Big Apple. Now you want to see how your products are selling in the city since you updated the descriptions last month. So you filter your sales report to see how many sales you’ve made in New York, in the last 30 days.
This kind of detail is why if you’re an ambitious Shopify store owner you’ll want to explore upgrading your plan (more on custom reports later).
Of course, whether you should upgrade to an advanced plan will entirely depend on your business needs.
The more you know about your customers, the more you can cater for their needs. And as any businessperson will tell you: a happy customer = a happy profit margin.
[UPDATE (October 2017) – Shopify have launched a new set of analytics tools to help store owners track how marketing campaigns (e.g. Facebook adverts) are performing. We won’t go into too much detail here, as this guide is about getting your Shopify analytics up and running. But the new Marketing Activity and Sales Attribution Reports look promising. Previously, you would have had to filter in Google Analytics to see how many sales came from a particular campaign. Shopify’s new reports will help you attribute sales to specific campaigns in Shopify’s own system. Definitely a positive forward step.
Further Reading
Shopify Pricing – for a detailed breakdown of what each Shopify plan costs (and which one is right for you).
How to Set Up an Affiliate Program For Your Shopify Store – to make a little extra cash on the side via partnering with popular providers.
The Best 5 Shopify Alternatives – the best ecommerce website builders that aren’t Shopify, to give you a FULL picture of your options.
Differences Between Google Analytics and Shopify Analytics
Squaring Shopify analytics with Google Analytics can be a bit of a headache. Sometimes they throw up different numbers and as a store owner we know you can feel pulled in two different directions.
These analytics discrepancies are nothing to worry about.
To get the most out of your store, you should be using both Shopify analytics and Google’s data tools together. Think of them as the left and right side of your store’s brain.
Shopify says that because Shopify analytics are connected to your store directly they are more accurate and update faster.
A common discrepancy reported by Shopify users is that their visitors number is lower than Google’s. This is likely down to subtle differences in how Google and Shopify record and track visitors.
Google Tag Assistant is a really handy tool that inspects your site and looks for any tracking script problems.
Bear in mind, though, that Shopify’s Customers reports are limited to 30,000 customers, so if you’re running a big ecommerce store and want data for more than 30,000 customers you’ll need to use Google Analytics.
CONCLUSION
If you’ve finished this guide and have more questions than when you started, don’t panic.
That’s exactly how it should be.
The more you discover about your store’s data, and the better you get at analysis that data, the more possibilities you throw up.
Running a Shopify store with analytics is like pushing a snowball down the mountain. The more you do it the more snow accumulates and the bigger the ball gets.
The important thing is to not see this as a headache, but a well of information you can use to improve your store and make more sales.
You now know how to add Google Analytics to your Shopify store, and how to start using it to learn more about your store.
To start with, don’t get bogged down in the analytics.
Focus on a few core areas of your site you’d like to improve and use Google and Shopify analytics to inform and support any changes you decide to make.
If you’re looking to build a really successful Shopify store, you now know how upgrading to a Shopify premium plan can help.
As we covered earlier, Shopify analytics get better the better your plan. So reports available to customers on the ‘Shopify’ plan or higher give you:
- Amazingly detailed information about your sales
- A clear breakdown of your store’s data
- The functionality to build custom reports
They can help you take your store to the next level.
You can use the button below to upgrade your Shopify plan today.
Found This Article Helpful?
Question – Did this discussion benefit you? Leave a comment below.
Do you know anyone who can benefit from this discussion? Send them this page or click on the share buttons on the left.
You’ll be helping us out by spreading the word about our website, and you’ll be helping them out!


2 comments